A root canal is a dental procedure that is commonly performed to treat an infected or severely damaged tooth. Although the idea of a root canal can sound intimidating, the procedure is a routine part of dental care and can help save a tooth from extraction. Root canals are performed when the pulp of the tooth, which contains nerves and blood vessels, becomes infected or inflamed due to deep decay, cracks, or trauma. In this article, we will explore how a dentist performs a root canal, step-by-step, and explain the reasons why this procedure is necessary for your oral health.
What Is a Root Canal?
Before diving into the specifics of the procedure, it is important to understand what a root canal is. The tooth consists of several layers: the outer enamel, the dentin beneath the enamel, and the pulp, which is located at the center of the tooth. The pulp contains nerves, blood vessels, and connective tissue. When the pulp becomes infected, it can lead to severe pain, swelling, and even the loss of the tooth. A root canal is a treatment used to remove the infected pulp, clean the inside of the tooth, and seal it to prevent further infection.
When Is a Root Canal Needed?
A dentist may recommend a root canal if you experience symptoms such as persistent tooth pain, swelling around the tooth, or sensitivity to hot or cold temperatures. In some cases, a tooth may be infected or damaged without causing noticeable pain, but the infection can still affect the tooth. A dentist can detect the need for a root canal through an X-ray or by examining the tooth and gums for signs of infection or damage.
Step 1: Diagnosis and Preparation
The first step in performing a root canal is a thorough examination and diagnosis. Your dentist will begin by discussing your symptoms and conducting a physical examination of the affected tooth. If there are signs of infection, such as redness, swelling, or abscesses around the tooth, the dentist may recommend an X-ray to get a clearer picture of the tooth’s condition. This helps the dentist determine if the pulp is infected or damaged.
Once the dentist confirms the need for a root canal, the procedure will be scheduled. In preparation for the procedure, local anesthesia is administered to numb the area around the affected tooth. This ensures that the patient remains comfortable and pain-free throughout the treatment. For patients with anxiety or those undergoing more complex procedures, the dentist may also offer sedation options to help them relax.
Step 2: Accessing the Tooth
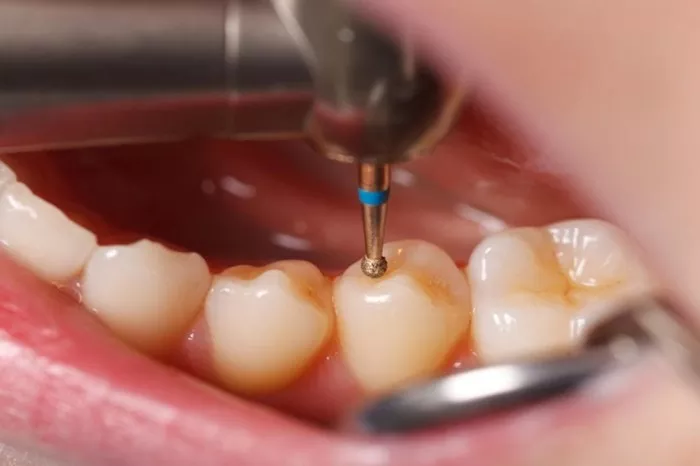
After the area is numbed, the dentist will begin the root canal procedure by creating a small opening in the crown of the tooth. This is done to access the pulp chamber, where the nerves and blood vessels are located. The dentist may use specialized dental tools to create this opening carefully. This access point allows the dentist to reach the infected or damaged pulp inside the tooth.
Step 3: Removing the Infected Pulp
Once the access point is created, the dentist will remove the infected pulp using small, precise instruments. The pulp is typically removed in sections, and the dentist will carefully clean and shape the inside of the root canal. This step is important because it ensures that all of the infected tissue is removed and that the canal is properly cleaned to prevent future infections.
The dentist will also clean the surrounding area to remove any bacteria or debris that may have accumulated inside the tooth. The canal is carefully shaped to make it ready for filling. Throughout this process, the dentist will periodically use irrigation solutions to flush out any remaining debris and disinfect the area.
Step 4: Shaping the Root Canal
After the infected pulp is removed, the dentist will need to shape the root canal to prepare it for filling. This step is important because it ensures that the canal is the proper size and shape to hold the filling material. The dentist will use specialized instruments called files to clean and shape the canal. These files are designed to remove any remaining tissue, smooth the walls of the canal, and ensure that the space is uniform in shape.
The dentist will often take additional X-rays to ensure that the canal has been properly shaped and cleaned. Once the cleaning process is complete, the dentist will proceed to the next step of the procedure.
Step 5: Filling the Root Canal
Once the root canal is properly cleaned and shaped, the dentist will fill the canal to seal it. The filling material used is usually a biocompatible substance called gutta-percha. Gutta-percha is a rubber-like material that fills the root canal and helps to prevent bacteria from re-entering the tooth.
The dentist will carefully place the gutta-percha into the root canal and ensure that it fills the space completely. The material is then compacted to form a tight seal. In some cases, the dentist may also use a special adhesive to reinforce the seal and provide additional protection.
Step 6: Sealing the Tooth
After the root canal is filled, the dentist will seal the access point that was created in the crown of the tooth. This is usually done with a temporary filling that will protect the tooth until a permanent restoration can be placed. The temporary filling helps to prevent bacteria from entering the tooth and keeps the tooth stable during the healing process.
Step 7: Placing a Permanent Restoration
In many cases, a root canal-treated tooth will require further restoration, such as a crown, to ensure its strength and function. After the tooth has healed and the infection has been fully treated, the dentist will place a permanent crown over the tooth to restore its structure and protect it from further damage. The crown is custom-made to match the shape and color of your natural teeth, ensuring that it blends seamlessly with your smile.
For some teeth, particularly those that are less visible, the dentist may opt for a filling instead of a crown. The decision will depend on the location and condition of the tooth.
Aftercare and Recovery
Once the root canal is complete, the dentist will provide instructions for aftercare to ensure that the tooth heals properly. Patients may experience mild discomfort or soreness for a few days after the procedure, but this can usually be managed with over-the-counter pain relievers. It is important to avoid chewing on the treated tooth until the permanent restoration is placed, as the tooth may be more fragile during the healing period.
The dentist may also schedule a follow-up appointment to check on the healing progress and make sure that the tooth is not showing any signs of complications, such as reinfection.
Why Is a Root Canal Necessary?
A root canal is necessary when the pulp of the tooth becomes infected or damaged, causing pain, swelling, or even an abscess. If left untreated, the infection can spread to other parts of the mouth, leading to more serious health problems, including the loss of the tooth. By removing the infected pulp and sealing the tooth, a root canal helps to preserve the tooth and prevent further complications.
Conclusion
A root canal is a common dental procedure that allows dentists to save teeth that would otherwise need to be extracted due to infection or damage. The procedure involves removing the infected pulp, cleaning the root canal, and sealing it to prevent future infection. While the idea of a root canal may seem daunting, the procedure is relatively straightforward and can provide significant relief from pain and discomfort. By following the proper aftercare instructions and receiving a permanent restoration, most patients are able to return to their normal activities and enjoy a healthy, functional tooth for years to come. If you are experiencing symptoms that may require a root canal, don’t hesitate to consult your dentist for further evaluation and treatment.
Related topics:
Why Is Tooth Extraction so Painful
How Quickly Can Tooth Decay Occur


